.webp)


George Howes
Master the steps on how to create a new Facebook Ad Account with our detailed tutorial. Dive in to launch your Facebook Ad campaigns successfully.
Looking to really elevate your advertising game on social media? Then creating a Facebook ad account to promote your business is a must!
According to SocialPilot, 34.1% of adults see Facebook adverts. This presents a golden opportunity for your business to tap into a vast audience and make a significant impact.
If you own a Facebook account, you've probably clicked on a few ads yourself - so, what’s stopping you from creating one?
This guide outlines step by step on how to create a Facebook Ad account. By the end, you’ll be fully equipped to launch your ad campaigns with confidence.
Let’s get started!
How to Create a Facebook Ad Account - Step by Step
Before you immerse yourself in the world of Facebook Ads, there are a few prerequisites you need to have in place. These components are required to set up an ad account and start advertising.
Here's what you'll need:
Facebook's business manager account is your central hub for managing all your pages and ad accounts. It's essentially your toolbox for ads, letting you edit your business's settings, create ads and monitor their performance.
With Business Manager, you can:
Follow these steps to create a new business manager account:
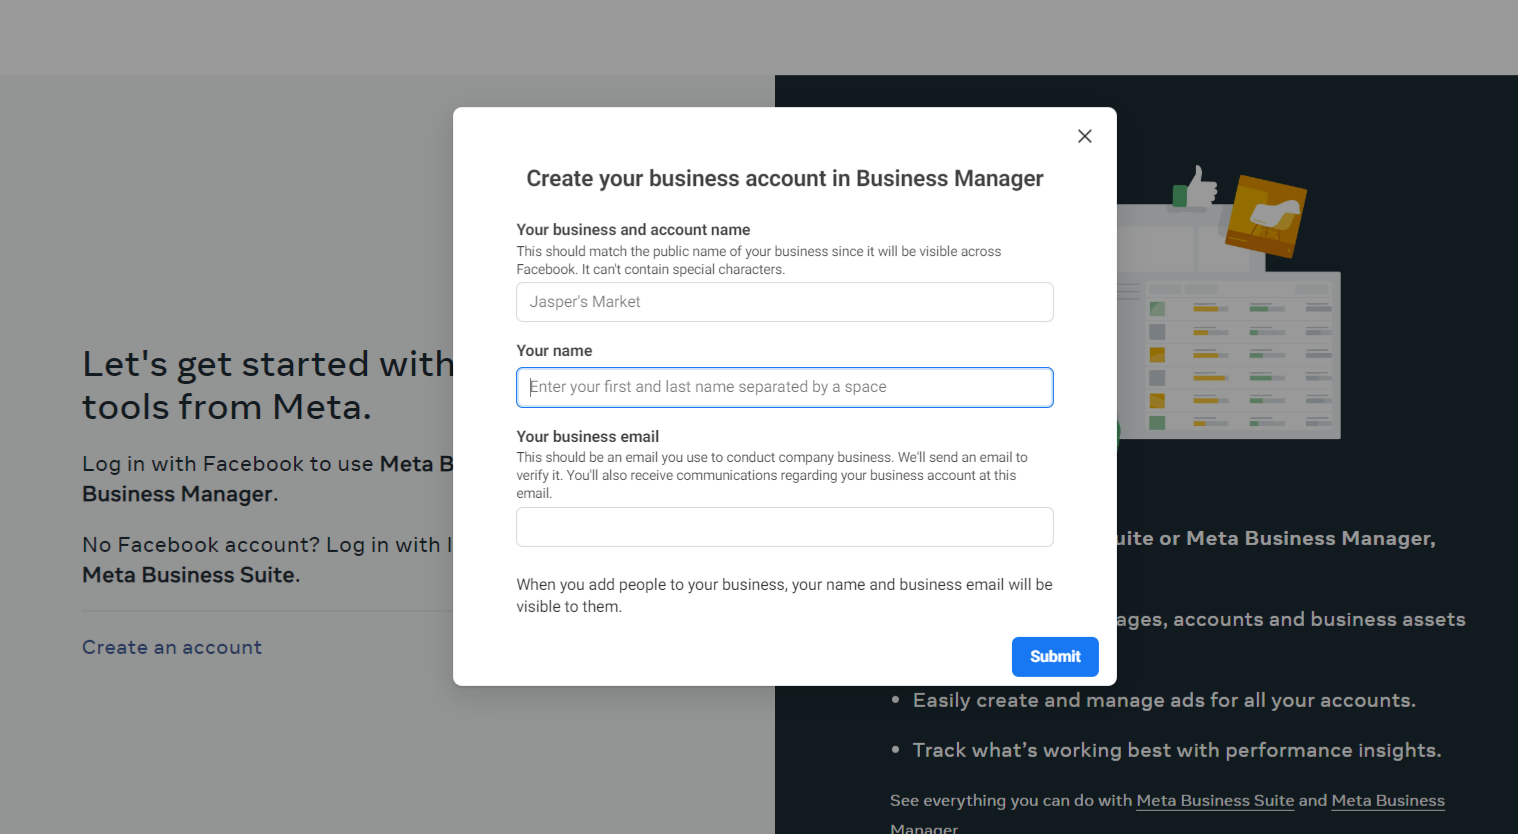
Congratulations, you now officially have a business account! Now you can add assets, such as pages, ad accounts, and people, to begin launching your Facebook ads.
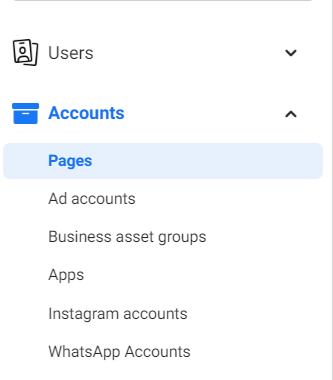
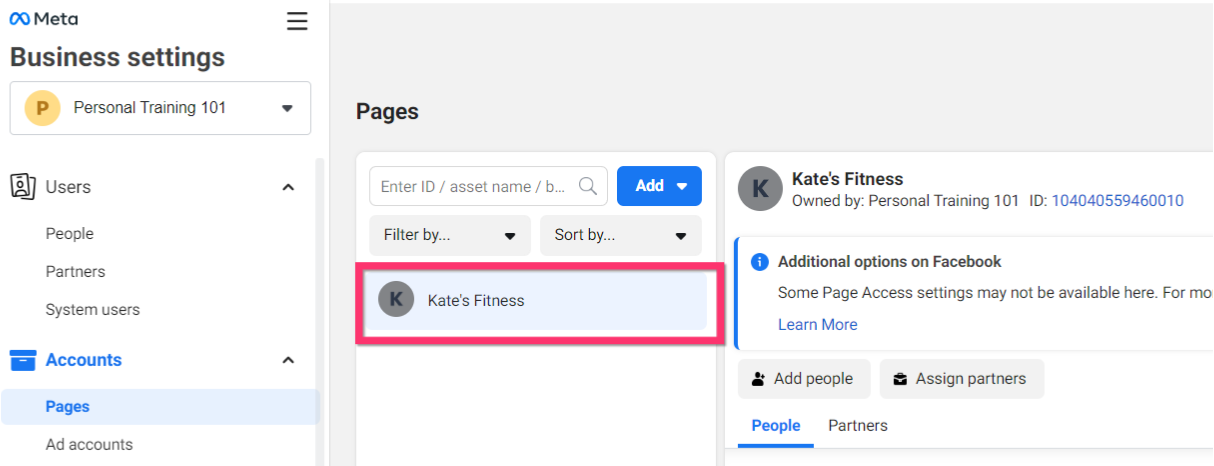
Adding a page to your business manager allows you to centralise control over your brand's online presence on Facebook. Here, you can post content, run ads and gain insights into your audience’s engagement levels and overall ad performance. This integration ensures that all your marketing efforts, from organic posts to paid promotions, are orchestrated from a single dashboard.
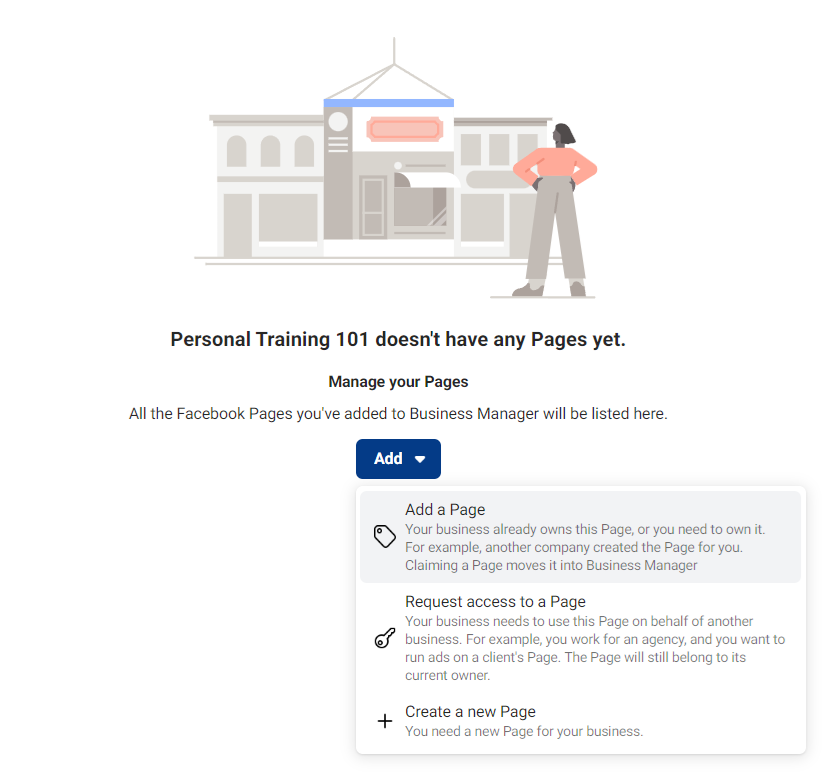
To add or create a page in Business Manager:

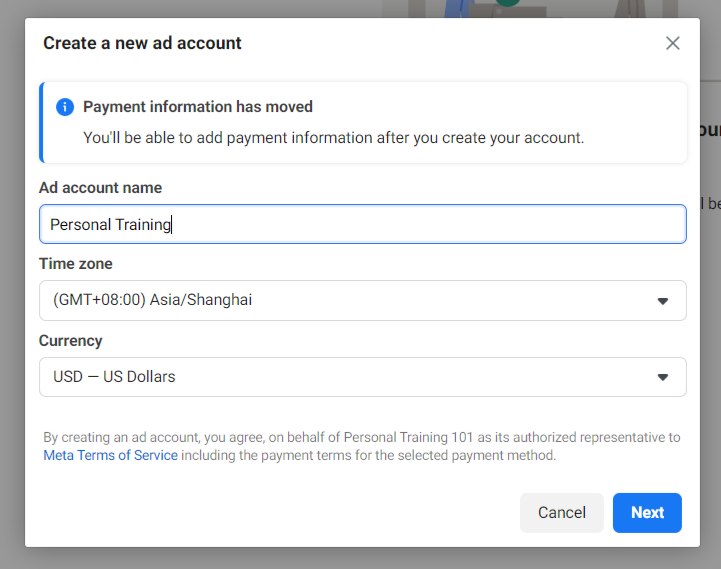
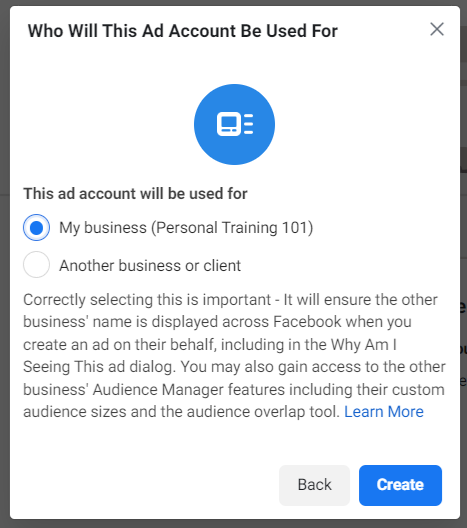
Now we're getting into the meat and potatoes of Facebook ads. But to run ad campaigns, you'll need to create an ad account first. This is a hub for all your campaigns and helps you manage campaign budgets, payment methods, billing information, and lets you add new users.
To create an Ad Account:
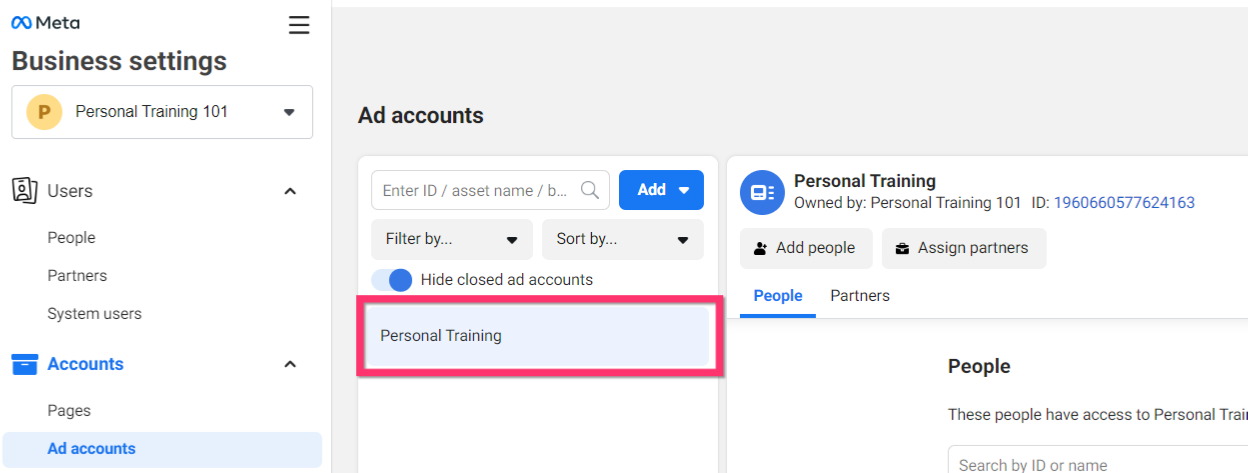
Congratulations, you've now officially created a Facebook Ad Account!
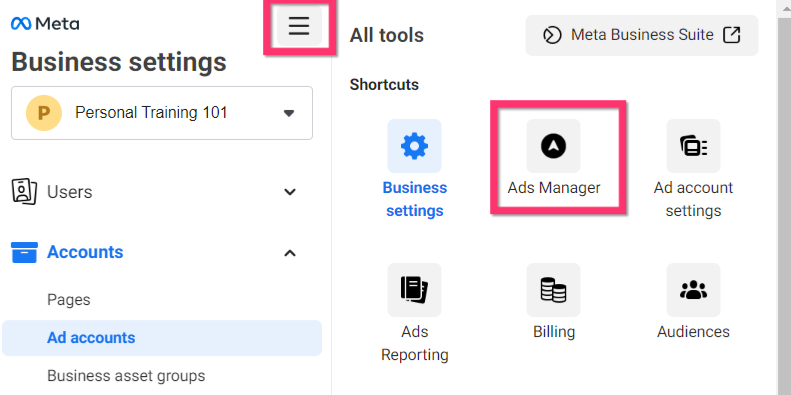
To start advertising, proceed to access the Ads Manager. You'll then be navigated to your 'Campaigns' pag , where you can start creating ad campaigns. To do so, press the grey square icon and select 'Ads Manager', as shown below:
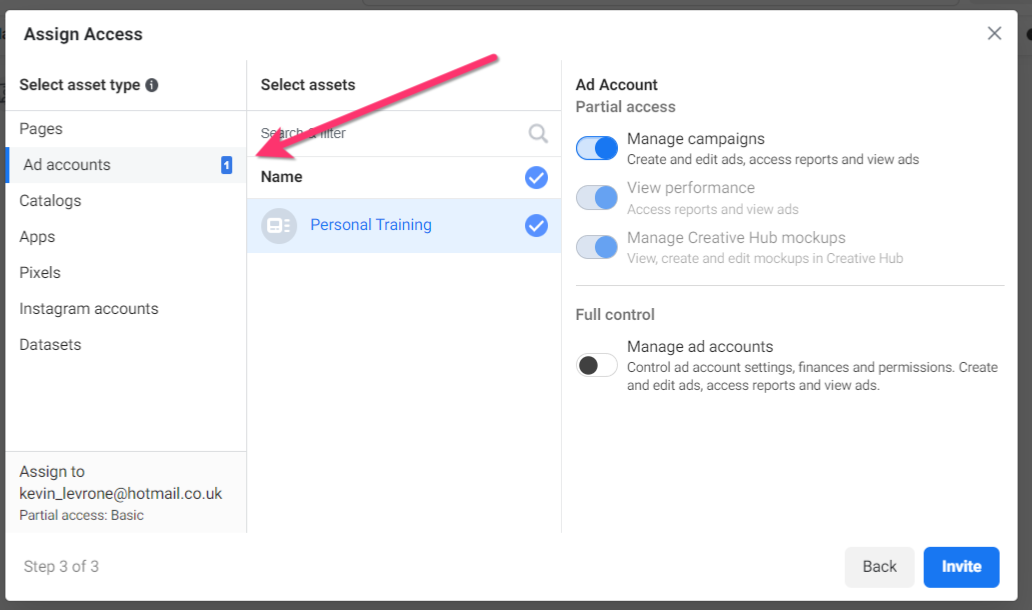
But before you dive head first, we'll show you how to add users to your ad account and assign different roles. This gives you a clear overview of who does what for your ads.
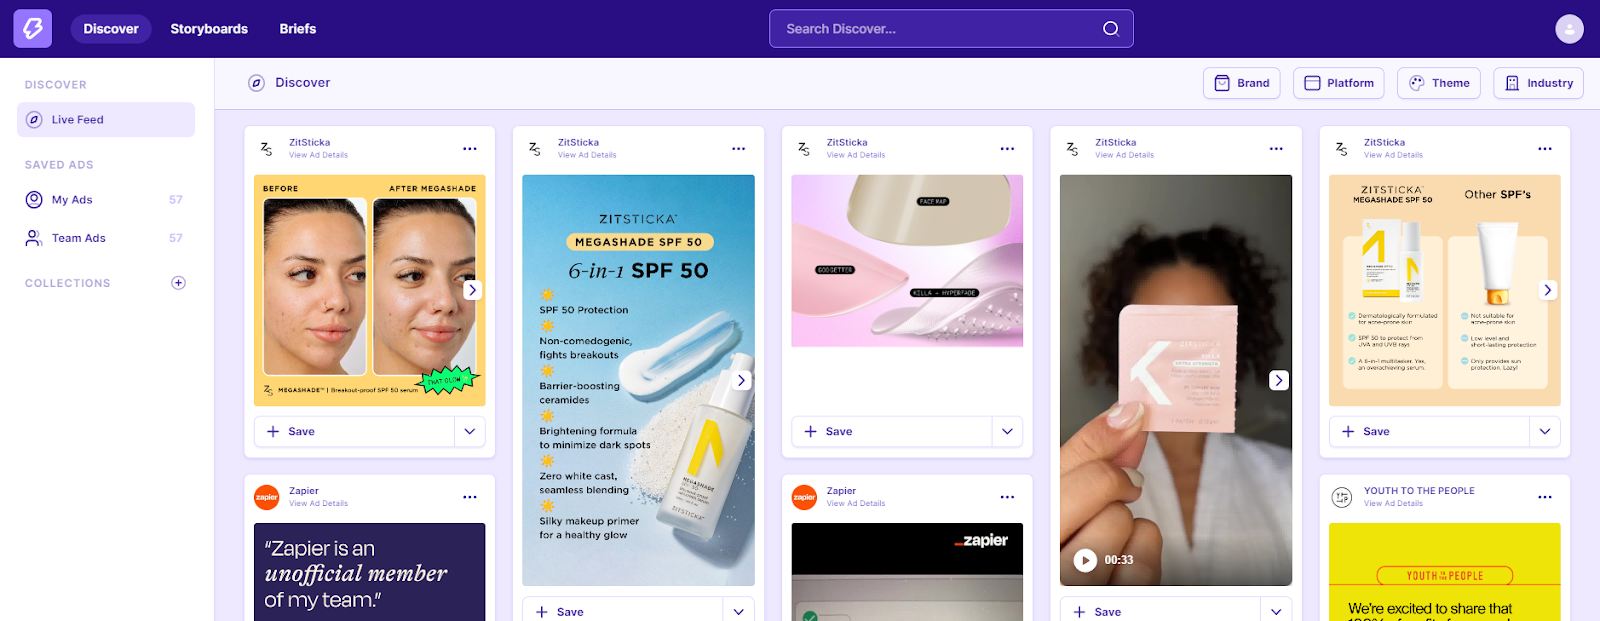
Looking to create Facebook ads that are unique and compelling?
Then it’s time to unlock advertising insights with MagicBrief's Chrome extension! Save and analyse competitor ads in our comprehensive ad library in seconds, then craft your winning strategy. Register and use our features for free today!
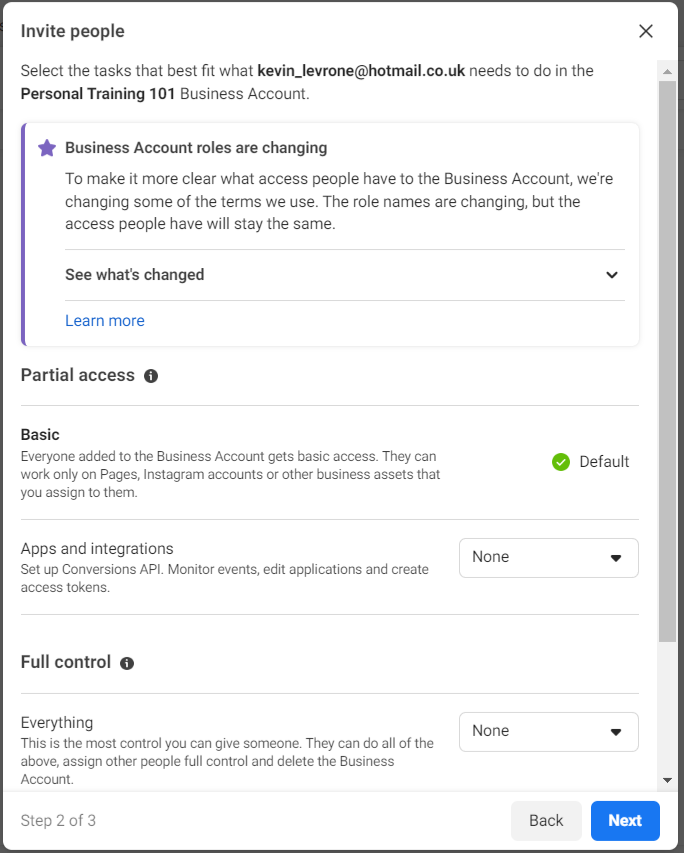
If you're running a company, chances are you're not a one-man show. You have various employees or a business partner who should have access to your ad account. In this section, we'll guide you through the process of granting them access via the business settings.
But before we explain how to do that, it's important to note the different roles you can assign: ‘Partial access’ or ‘Full control’.
Business owners usually only give full control to another business partner. This acts as a backup in case your account is restricted or deleted, where you need someone to continue managing the ads.


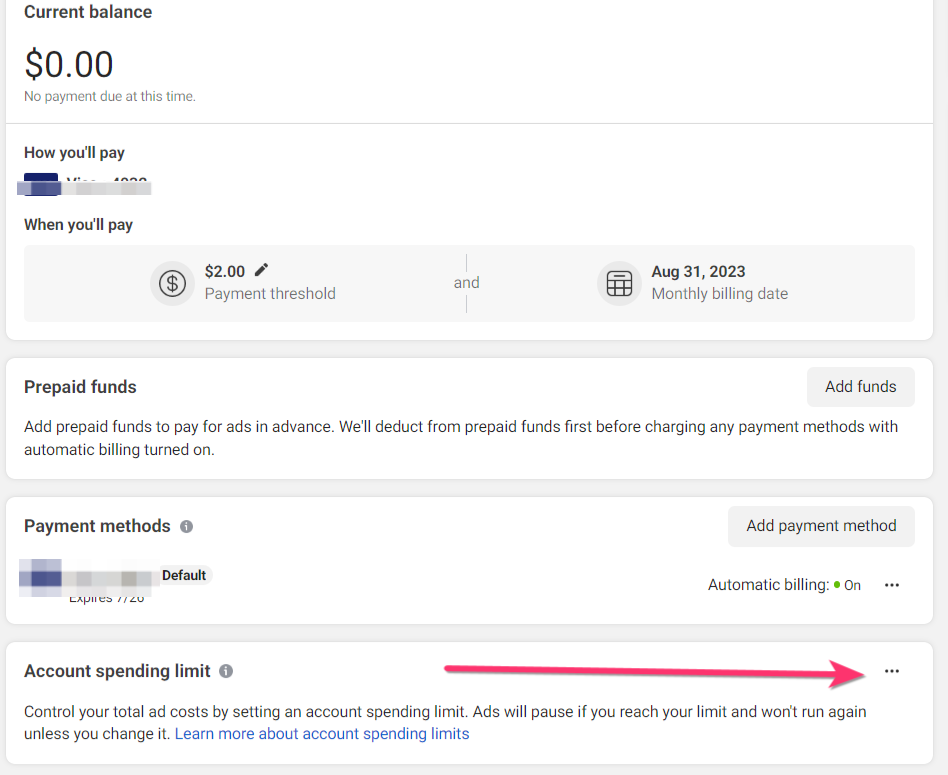
You'll need to link up a valid payment method to your Facebook account for it to be approved and ready for ads. If you're linking your credit or debit card, ad spend will automatically be charged to that card.
To add a payment method:
You'll then be charged for all your ad spend from this payment method. It's crucial you keep your payment information up to date as it could force Facebook to pause your ads if payment doesn’t go through.
Billing options come in two forms:
Both options are secure for users. However, automatic payments are a little more nuanced, as you'll either get a bill at the end of the month or when you hit your threshold.
A payment threshold is basically a set limit set by Facebook. When your ad costs hit this limit, Facebook sends you a bill. It ensures you're only billed for what you've spent on ads.
New accounts start with a small threshold, typically $25. Over time, as your account ages and you continually pay your bills, Facebook automatically increases your threshold. This is useful for users wishing to monitor their ad spend closely.
Your account spending limit sets a maximum budget cap for your account overall, which is adjustable to suit your needs. For example, if you have a specific monthly budget for a campaign, you can set the limit to match. Once this limit is exceeded, Facebook will pause your ad campaigns.
You can adjust your account spending limit to ensure you don't overspend on campaigns. This feature acts as a safety net, preventing any unexpected expenses.
To reactivate your ads once the limit is hit, you must adjust your account spending limit, remove it altogether, or reset the spent amount back to $0.
To adjust your spending limit:
Your account spending limit is now set!
Just note that it takes around 15 minutes for the limit to be updated in your account. After creating an account spending limit, you can track ad costs relative to that limit in your payment settings.
You always want to stay in the loop when advertising on Facebook, whether it’d be your total expenditure or your ads performance. This is why you want to be notified when there are significant changes in your campaigns.
By the same token, you don't want too many notifications swamping your inbox as you'll get overwhelmed. Facebook allows users to customise their notifications settings to get the proper information for their campaigns.
To review your notification settings:

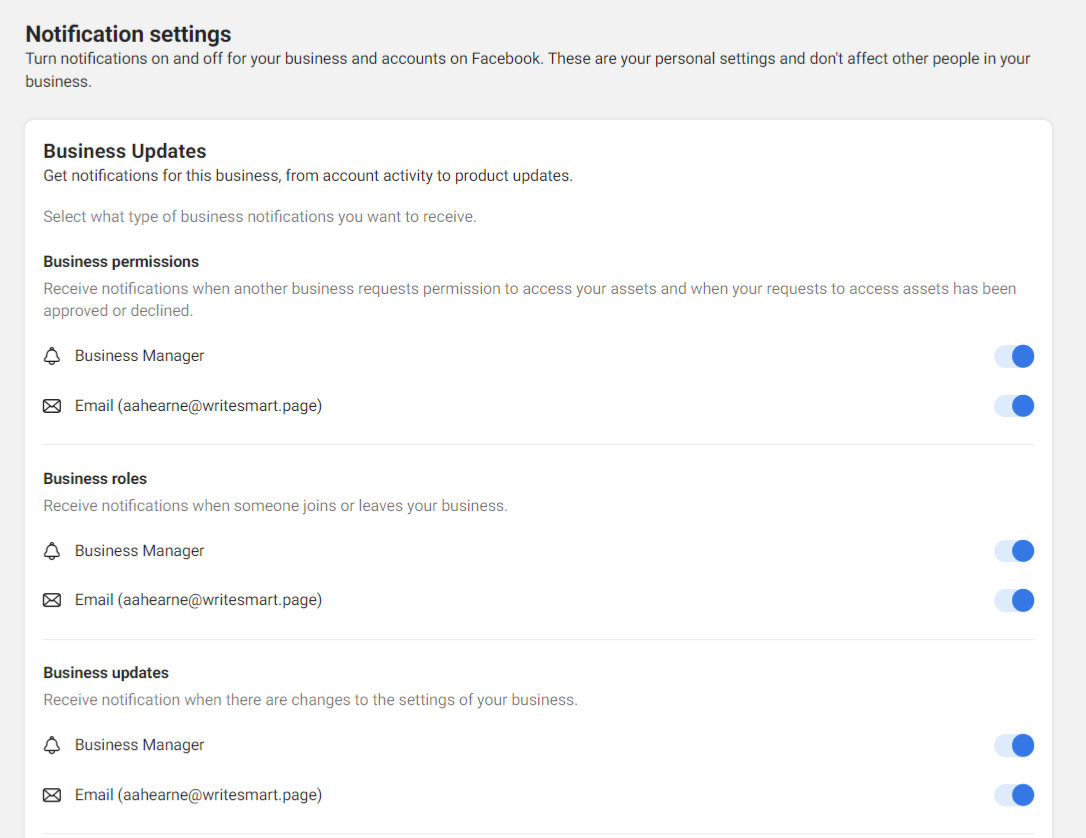
While we recommend leaving most notifications on, you can customise the settings to your personal preferences. That way, you'll only receive what matters to you the most!
Facebook campaigns have different components, such as the campaign, ad set and ad itself. By understanding how this hierarchy works and how they fit together, you make the most of your ad campaigns.
Let’s go through each one below:
Your campaign is essentially your overarching strategy and goal for your ads. While the goal is always to increase your bottom line, you want to be more specific on what your ads do for you.
In 2023, these are the campaign objectives currently available:
Each objective has its own unique set of optimisation options. For example, the sales objective allows leads to contact you directly via phone calls or messaging apps. Meanwhile, the engagement objective focuses on boosting interactions with your content, whether through likes, comments, shares, or video views.
When optimising your campaigns, always remember your goals, budget, and time frame. Optimise for deliverability as well as cost efficiency to ensure long-term success. You also want to track and measure your campaigns progress regularly and make the necessary changes quickly.
An ad set is where you get into the details of your campaign. Here, you'll define your target audience, ad placement, budget, and schedule.
Users can create multiple ad sets, each with a custom audience and separate budget. For example, in one ad set, you might focus on women aged 18-34; in another, you could target men aged 35-50. You can even allocate different budget amounts for different ad sets.
After running multiple ad sets, you can compare each one to identify your top performers. Facebook will also automatically allocate more budget funds to your best-performing ad sets and pause those that perform poorly. However, you can turn this option off if you prefer to review the performance yourself.
Finally, now we come to the final piece of the puzzle - the ad. Now you can really get your creative juices flowing!
Adverts come in different ad formats, allowing you to showcase your products/services in different ways. For example, you can create a single image ad with a compelling visual and text or use carousel ads to display multiple products.
Furthermore, the ad itself should be tailored to your chosen campaign. For example, an ad made to increase traffic might feature a preview of the site's content and a compelling call to action. Meanwhile, ads made to encourage app installations would showcase app features and explain how they solve users pain points.
In any event, you must ensure your ad aligns with Facebook's advertising guidelines to avoid disapproval. Ads with pixelated or blurry visuals, offensive language, or inappropriate images will be rejected. You must also ensure your landing page is free of bugs and broken links.
To summarise all the above, Facebook advertising structure is similar to building a house. The campaign is your foundation, the ad sets your walls, and the ad your interior design. Once you’ve meticulously crafted each layer, you can start fulfilling your marketing goals.
Creating a successful Facebook ad campaign is highly rewarding, yet many businesses struggle to get it right. But by following our quick and easy guide you should have all the information to launch successful advertising campaigns and drive more traffic or conversions to your website.
Just be sure to notice the small details. Setting up a Facebook Ad Account is simple, but there are multiple components that should be customised to your business's unique goals. Also, be sure to monitor the performance of each ad campaign and optimise where appropriate.
Now all that's left is for you to get out there and launch a great Facebook Ad Campaign! Good luck!
At MagicBrief, we view competition not as an obstacle but as a goldmine of creativity and knowledge. That's why we've developed tools to effortlessly capture, store, and dissect your competitor's advertisements.
With our Chrome extension, you can seamlessly save ads to our curated ad library on top of the Facebook Ad Library. This will help you to access your favorite ads, even if they are disabled or not running.
Dive deep into analysis and craft your unique adverts inspired by your competition. This not only keeps you updated on competitor moves but also sharpens your advertising strategy.
Experience the MagicBrief difference! Register now and explore our tools at no cost. For a deeper dive, consider upgrading to unlock our full suite of features.