They say timing is everything, and that holds true for digital marketing. To really draw eyes and maximise engagement, your content needs to be posted at the right times. If not, it doesn't matter how brilliant your posts are - they won't get the attention they deserve.
That's why it helps to know how to schedule Facebook posts. Scheduling lets you plan and control when it’s posted, ensuring you never miss a beat.
When you can plan and schedule Facebook posts in advance, you will:
Become more consistent and organised in delivering content to your followers.
Reach your audience when they’re most active.
Potentially display your Facebook posts to new audiences, broadening your reach.
Improve efficiency by automating part of the social media management process.
Align posts with any events, or promotions you’re offering at those times.
In this guide, we’ll run you through how to schedule Facebook posts, as well as reels and stories. We’ll cover the basics of setting up, editing and rescheduling a scheduled post, ensuring you're well-equipped to manage your content effectively in 2023.
Where and Who Can Schedule Posts on Facebook?
Facebook only allows business users and group members to schedule posts from desktop and mobile devices. This means you can’t schedule posts directly from your personal Facebook profile.
With the Meta Business Suite, you can schedule posts with in-built schedule features. Alternatively, third-party social media management tools like Buffer Sprout Social and Hootsuite also offer easy-to-use Facebook scheduling tools.
In all cases, Facebook doesn't allow users to schedule posts more than 30 days in advance.
How to Schedule Facebook Posts?
If you haven't already, create a Facebook Business Page. This is required to access the Meta Business Suite, a platform that lets you manage advertising, scheduling and content production.
After logging into your Facebook account, follow these steps:
Go to your Facebook Business Page.
Select 'Meta Business Suite' from the left sidebar.
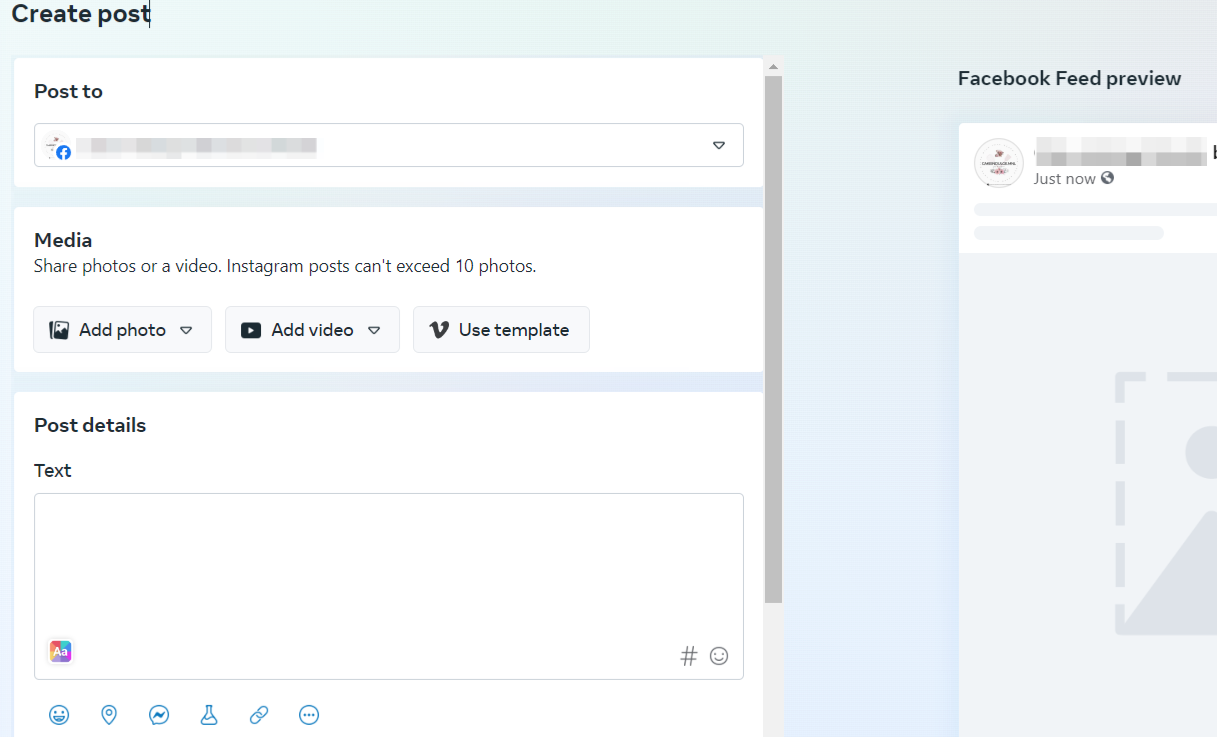
Click on ‘Create Post’. You'll then be navigated to the post creation screen.
Choose which pages and platforms you want to share your post on.
Upload any images or videos you may have, and include the copy itself.
During this process, you can also use one of Facebook's in-built templates which offers pre-made designs for posts, reels and stories and ads. Alternatively, their suite of editing tools allows you to tailor your content as desired. In your post's text, there are multiple options to further enhance your post - use emojis, location, A/B testing, etc.
On the right hand side, you'll see a preview of how your post will look like to your audience. This ensures your vision is delivered.
Once satisfied, click on ‘Schedule Post’ and set a date and time. Remember that you can only schedule up to 30 days in advance.
(Optional) Click on ‘Active times', if you want Facebook's algorithm to select the best times for your posts based on when your followers are online. However, it will only show you this information for today, tomorrow and the day after.
Click on 'Schedule' to submit your Facebook post.
Congratulations! You now know how to schedule a post on Facebook.
While this certainly puts you in good stead when planning individual pieces of content, it can become mind-numbing if you have multiple posts to schedule. You'll have to manually repeat the steps for each of them.
Thankfully, there is a way to schedule multiple posts in one go, which we'll explain later on:
How to edit a scheduled Facebook post using the Planner
Sometimes, scheduled posts need to be edited for different reasons. Maybe you didn't include your CTA or the copy just sounded bad on second glance.
To edit a post, follow the steps below:
Go to your Meta Business Suite.
Click on the 'Planner' icon on the left hand side of the screen.
You'll now have a birds eye view of your scheduled posts of the week. If you want to see all scheduled posts for the month, click on 'Month' on the top left hand side.
If you have different types of posts scheduled, filter the results by selecting your desired post type under 'Content type:all'.
Select your post and either click on 'Publish Now' or on the three dotted icon.
Click on 'Edit Post' to edit the post’s content, title, image and rescheduling date.
Make the changes required and hit 'Publish now'.
How to edit a scheduled post using the Facebook Content tab
If you want a more comprehensive content tool, use Facebook’s content feature. You’ll then be able to view, and manage to see all content types, from adverts to organic posts. The process to edit scheduled Facebook posts is slightly different, but just as easy:
Go to your Meta Business Suite.
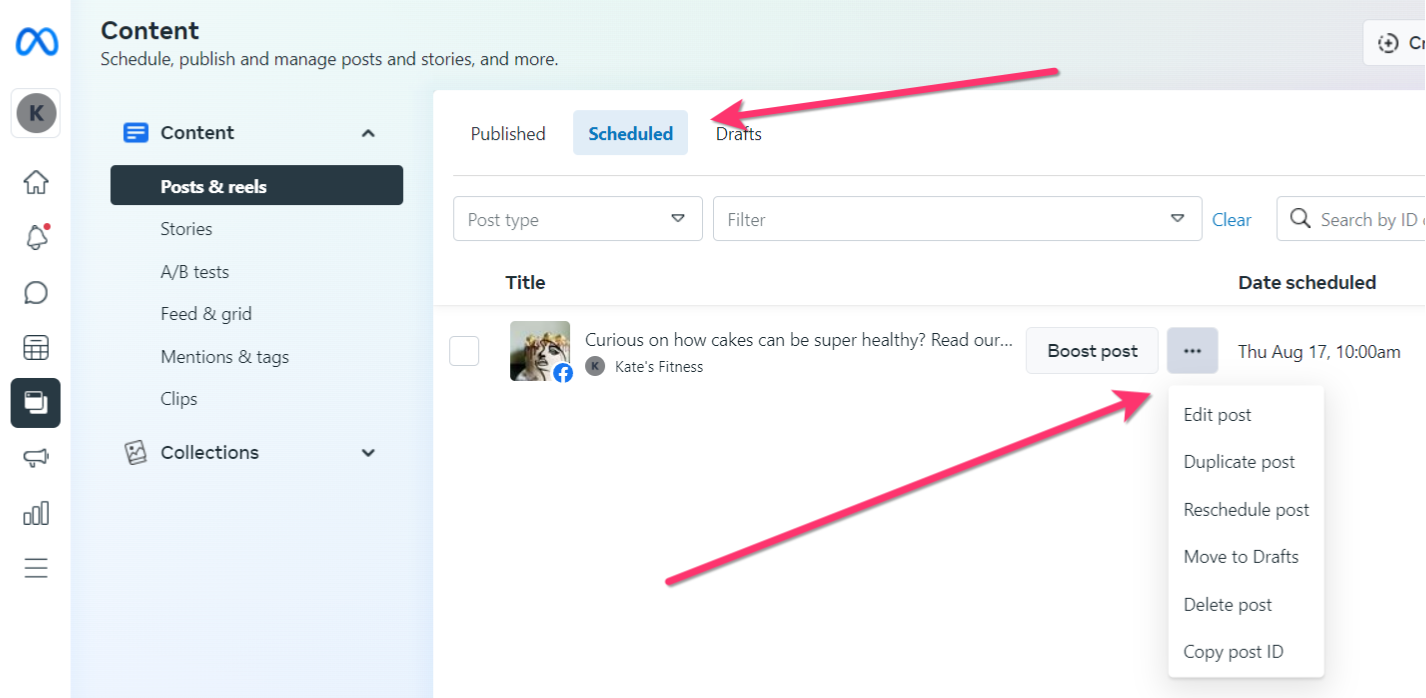
Click on the 'Content' icon on your Facebook sidebar.
Select 'Scheduled' from the options above, then click on the three dotted icon next to your post.
You can now edit or delete your Facebook post or reschedule it to a new date.
After making the necessary edits, hit 'Schedule Post' and you're done!
You now know how to edit a scheduled post using both the planner and content tabs! Always review and double check your scheduled posts before publishing. This way, you ensure your posts come out exactly as you envisioned.
How to reschedule a scheduled Facebook post
You've scheduled all of your Facebook posts, but there's only one problem - some of the times and dates are wrong! Instead of deleting your post and starting anew, you can just reschedule your upcoming Facebook post.
Here's how you do it:
Navigate to your Meta Business Suite.
Click on the content icon located on the suite’s sidebar on the left-hand side.
From the content dropdown menu, select 'Posts & reels'.
Click on the 'Scheduled' tab.
Locate and click on the scheduled post you wish to reschedule.
If you have multiple, you can filter by post type, marketing channel, placement and more.
Click on the grey three-dotted icon, and select 'Reschedule post' from the dropdown options.
Set the new desired date and time, then click 'Save'.
It's worth noting you can also edit, and delete posts using the same process. You can also use this method to edit and reschedule Facebook Stories and reschedule Facebook reels. However, for the latter two, we'll cover those in their own separate sections.
How to Schedule Multiple Posts on Facebook
Many businesses today rely on compelling visuals, videos or experiences to keep their audience engaged. As such, posting a single post every now and then isn't going to cut it.
Below we'll outline steps to quickly queue up a series of posts and schedule them in one go. You also won't need any costly third-party tools to do this, just Google Sheets.
Step 1: Create a master spreadsheet for upcoming posts
To simplify things, you want to consolidate all potential posts into one spreadsheet. Content can range from blog posts, images, videos, events, podcasts or anything else. This helps you quickly organise and review all upcoming content, as well as make amends prior to scheduling.
Start by logging into your Google Drive account. Click the New button on the top left hand side, > 'Google Sheets' and 'Blank Spreadsheet'.
On your new spreadsheet, name the first three columns 'Date', 'Post' and 'Link'. You can also include the time and date if your posts are time sensitive.
If you're scheduling multiple posts in one day, hover over the corner of a cell until you see '+' sign and drag it down to quickly populate more cells.
Step 2: Input all relevant post details
Proceed to fill in the rest of the columns. Under Post, include your post's heading and its associated hyperlink under 'Link'.
If you have any images, videos or other accompanying content, you can include them in additional columns or new sheets. We recommend creating new sheets to prevent your main sheet becoming cluttered.
Step 3: Copy and paste posts into Facebook from your spreadsheet
The next step is to transfer all your posts into Facebook.
Open your Meta Business Suite in one window and your content spreadsheet in another. Ensure they're side by side so you can transfer the content quickly.
Click on 'Create Post'.
Follow the steps mentioned above to create a post, such as adding a title, image etc.
Create a post for every row in your spreadsheet. Make sure you copy and paste the content exactly as it was written in the spreadsheet.
Once you've created each post, hit 'Schedule' or 'Save as Draft' to store them for scheduling after 30 days.
Although using this method requires you to manually input content, it should streamline the process. By having everything pre-planned, you can hit publish quickly and efficiently.
Plus, if you want to measure posts’ success, you could input the data from each post's performance directly into your spreadsheet. You can evaluate what works and what doesn't, allowing for future content strategy improvements.
How to Schedule Facebook Posts from a Group
While you can't schedule posts on your personal profile, you can if you're an admin or moderator of a Facebook group. This is important for businesses or organisations that want to stay top of mind for their communities. However, Facebook does not allow group members to schedule or edit scheduled posts.
Here's how to do as a Facebook admin or moderator:
Go to your Facebook group's page.
Click on the grey 'Write something...' box.
Write your post and include any relevant images.
Click on the schedule post box on the bottom right hand side.
Choose a time and date and click ‘Schedule’.
Scheduled group posts can range from announcements, promotions, events and more! To make the most out of them, engage with your community and respond to their comments and Dms. You'll quickly build relationships, create customer trust and establish yourself as an authority in your field.
How to edit a scheduled Facebook Group post
Editing a scheduled group post is just as straightforward as editing a business post. Here’s how to do it:
On your group's home page, click on the grey three dotted box next to the '+Invite'.
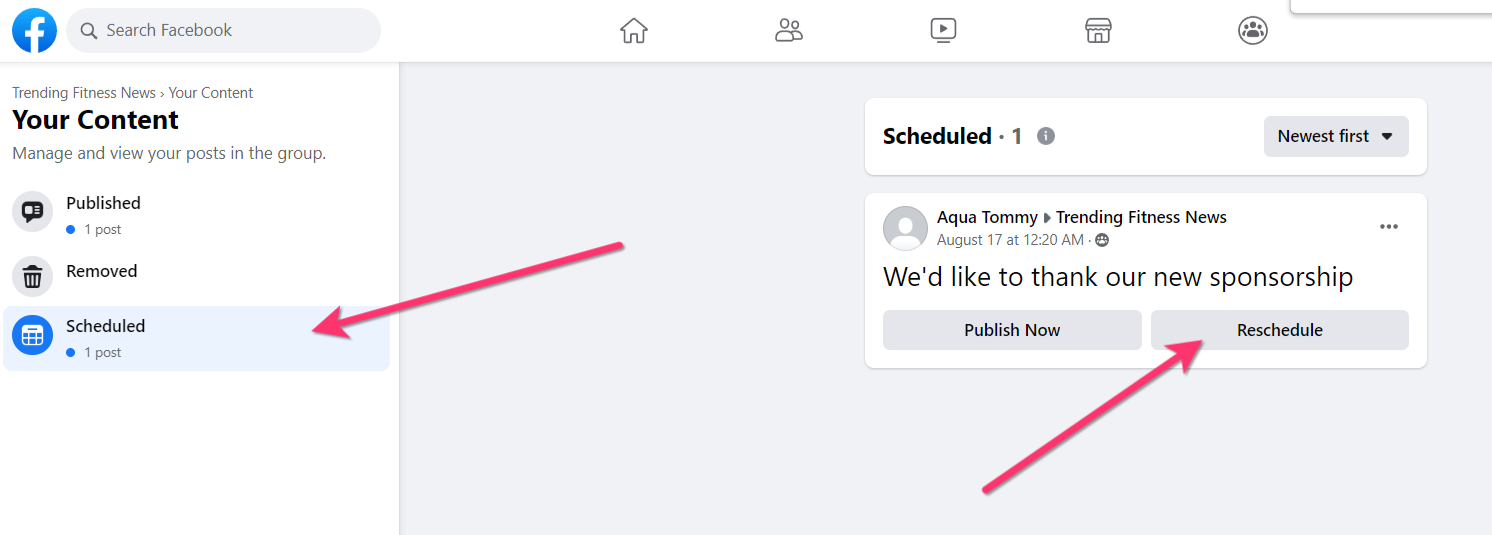
Select 'Your content'.
Click 'Scheduled' on the left hand side. All scheduled posts will now be displayed.
Click on 'Reschedule'.
Choose your date and time and select 'Reschedule'.
You've now successfully edited your scheduled group post. You can repeat this process for any other scheduled posts that need editing.
How to Schedule Facebook Stories
Facebook stories add a personal touch to your content, and a surefire way to attract new followers. Whether it'd be a behind the scenes look at your business, or a ‘day in the life’ video, scheduling Facebook stories at the right times works!
Here's how to schedule Facebook Stories:
Go to your Meta Business Suite.
Click on 'My Planner' on your page’s left sidebar.
Click on the downwards arrow, next to 'Create'. This can be found at your page’s top right hand side.
From the dropdown menu, click 'Create story'.
Choose the page you want to share your Facebook story.
Include your media, which can be up to ten videos and images. You can also use their creative tools to customise your story's creative even further.
If it's a video, you can also post it as a Facebook reel. We recommend you use both, as it could increase your reach.
Click on the blue downward arrow next to 'Share story', and select 'Schedule story'.
Choose an appropriate date and time and click on 'Save'
If you're unsure on the best time, click 'Active Times' to get Facebook’s recommendations. However, these times are only for today, tomorrow and the day after.
How to reschedule a scheduled Facebook Story
If you're scheduling multiple Facebook Stories, it’s not unexpected to eventually input the wrong date or time. Here's how to reschedule an already scheduled post:
Go to your Meta Business Suite.
Select the content icon on the left hand side.
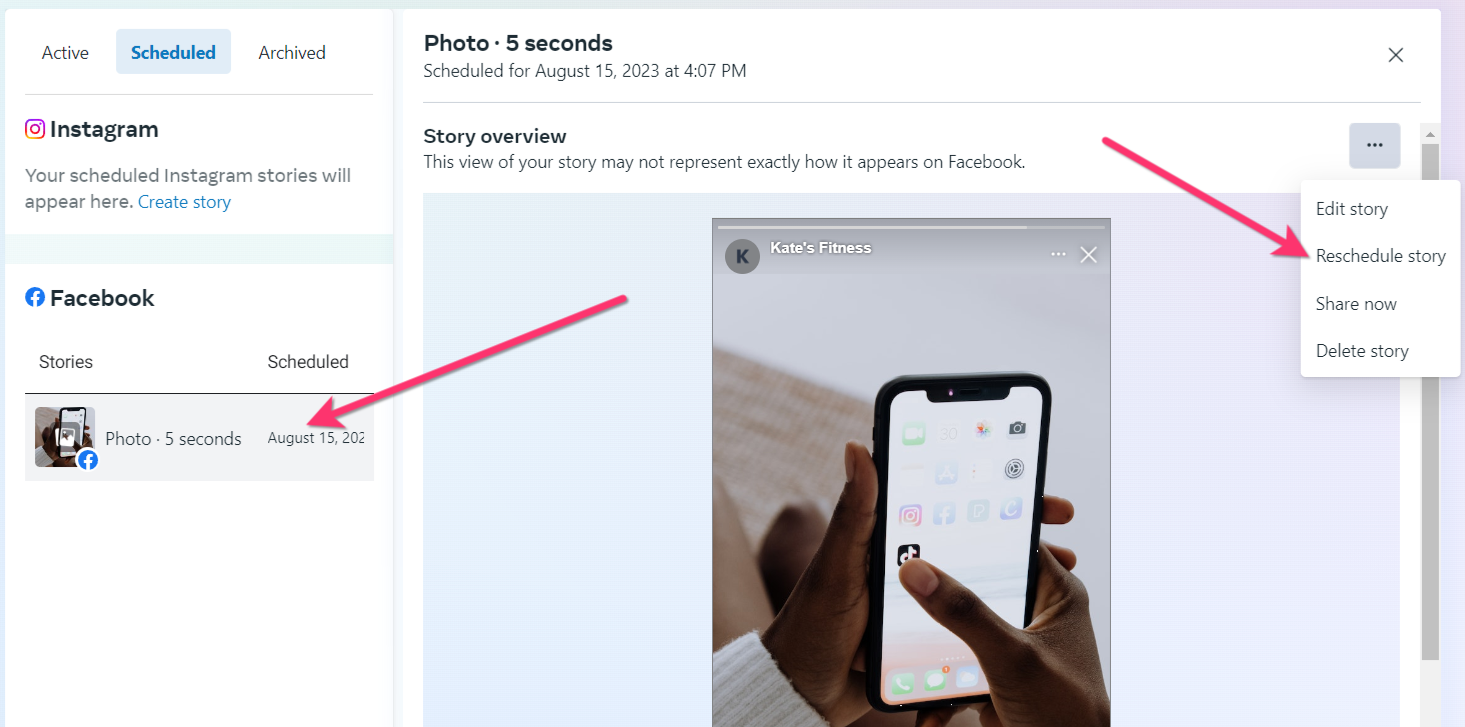
Select 'Stories' from the content dropdown menu, and click one 'Scheduled' tab.
Click on your story.
Select the three dotted icon, and click on 'Reschedule story' from the dropdown menu. From here, you can also edit or delete your story.
Schedule a new time and date and select 'Save'.
How to Schedule Facebook Reels
Scheduling Facebook Reels follows the same steps as scheduling a Facebook story. The only difference being that there's an additional editing page.
Here's how to schedule a Facebook Reel:
Go to your Meta Business Suite.
Select ‘My Planner' on the page’s left sidebar.
Click on the downwards arrow, next to 'Create' located at your page's top right hand side.
Select 'Create reel'.
Choose a page to share your reel.
Add your video/s and thumbnail.
Scroll down and select 'Next'.
On your tool screen, feel free to add audio, text or other features, and click on 'Next'.
Under 'Schedule Options', click on 'Schedule'.
Choose an appropriate date and time, and click on 'Save'.
How to reschedule a scheduled Facebook Reel
If you've made a blunder on your scheduled reel’s time and date, don’t worry. It's easy to change it:
Click the content tab on your Meta Business Suite’s left hand sidebar.
Find your desired rescheduled reel and click on its downwards arrow.
Click on the three dotted icon next to your reel name, and select 'Reschedule reel'.
Choose a new date and time, and click on 'Save'.
You've now scheduled your Facebook Reel! Just note that you can't edit scheduled reels like with Facebook stories, so make sure to get it right the first time. We recommend that you use both strategic scheduling of stories and reels to increase your reach.
How to Review Your Scheduled Facebook Posts, Stories and Reels
Chances are if you routinely create content, it'll be a mix of scheduled and published posts, stories and reels. Over time, all this content can pile up and it might be difficult to manage and track. The good news is you'll be able to view all your scheduled content in one place.
Here's how to see all upcoming content from your page: :
Go to your Meta Business Suite
Select the content icon on the left hand side.
In the content menu, select the type of media you'd like to view. Incidentally, you can also view your A/B tests, mentions & tags and much more in this same menu.
Click on the 'Scheduled' tab to view all your scheduled posts, stories and reels.
Possible Reasons You Can't Schedule Your Facebook Post
Looking to schedule a Facebook post only to hit a roadblock? Let's go through potential issues and how to solve them.
No Meta Business Suite account: You'll need a Business Page and Meta Business Suite account to schedule content. This type of account is typically used by organisations or businesses to manage their content and advertise online.
No permission: Even if you can access a Meta Business Suite account, you might not have permission to schedule content. In this case, you’ll need to contact the admin asking for permission.
It's too far in the future: You can't schedule posts further than around 30 days ahead. If you have long-term content plans, you can create or use an online content calendar to better keep track.
Compromised Facebook server: Although this is more rare, Facebook's servers might be having trouble. If your content is not being published, try again in a few hours.
No internet connection: If your connection is intermittent or weak, scheduling might not work. Make sure you have a strong network connection before trying again.
Inappropriate content: Images, videos or text containing inappropriate content i.e nudity, profanity or hate speech will not be approved. Be sure to review your content before submitting it for scheduling.
Content promoting illegal activities: Facebook has tight restrictions on what kind of content can be posted. Any posts containing drugs, weapons, etc will not be approved.
If you've remedied any of the above issues and still can't schedule a post, do the following:
Contact Facebook: You can speak to a live agent by visiting the Facebook Business Support Help Page, clicking on 'Contact advertising support' and following the instructions from there.
Alternatively, you can click on your profile photo, and click 'Help & support' from the dropdown menu. From there, select 'Help Center' > 'Support Inbox' > Report a problem. You can then submit a support ticket.
Clear your browser cache: This can help fix any issues related to your browser, which could be preventing you from scheduling posts. If you're on Google Chrome, click on the three dotted icon > 'More tools' > 'Clear browsing data'. You can also pick the time range for which you'd like the cache to be cleared.
Try a different browser: You can try scheduling a post from a different browser, such as Safari or Mozilla Firefox, and see if it works.
Update your browser: You can also try updating the browser to the latest version for a smoother experience.
Best Practises for Scheduling Facebook Posts
Use a content calendar: While you could just schedule a new piece of content as it comes along, keeping a content calendar before scheduling can be incredibly useful. This way you can plan the order and frequency of your posts ahead of time, have multiple people collaborate on content ideas, and track analytics from past posts to see what worked best for your brand.
Adjust for time zones: If your business’ main audience is abroad, use analytical tools to identify their peak times and schedule content accordingly.
Be consistent: If your scheduled posts are erratic i.e. one day you post multiple times and the next day none, your followers won’t be able to keep up. Your audience should know when to expect new content, so make sure to post regularly.
Don't plan too far out: Besides Facebook having an approx 30 day limit for scheduling posts, it can be counterproductive to plan content too far out. Social media trends and conversations rapidly change, and what was relevant two months before could be outdated now. Try to focus on scheduling posts that are close to the present or future
Engage with your audience: While it's tempting to simply schedule your posts and move on, don't forget to engage with your audience. Read the comments, reply to messages, and answer questions promptly. And if you do receive feedback, consider taking it onboard - a consumer's perspective is invaluable.
Review your schedule based on performance: Regularly review your posts performance. If, for, example, you're solely posting on weekdays but see more engagement on weekends, consider changing your schedule.
Mix up your content: Schedule reels, posts, and stories to really engage with your audience. Remember that different Facebook users are more active on certain types of content, so mixing it up can help to reach wider audiences.
Avoid over-posting: Flooding your followers with too many posts can be off-putting and even cause Facebook to disable your account. At most, you generally shouldn’t post anymore than twice a day.
Utilise automated tools: You can use tools like 'PromoRepublic' to automate your posting schedule. This can save you time and make sure that posts are running when you're away from the computer.
Final Thoughts
Facebook in-built scheduling feature is a convenient tool that can complement your content strategy. You won't miss content opportunities and can adjust it to better suit the preferences of your audience. With a few simple steps, you'll be scheduling effective posts in no time!
Just be sure to research the best times to post. While you can schedule posts at random, optimising your content for peak hours will draw the right eyeballs in. And if you're not sure, use Facebook's 'Active times' feature before scheduling to find out when your followers are most active.
Facebook scheduling is a great way to improve your content strategy, so make sure you take advantage of it in 2023!
Good luck and happy posting!
Use MagicBrief to See What's Trending on Facebook
If you're a business, digital marketer or content creator who advertises on Facebook, it pays to stay up to date with the latest trends. You want to download Facebook ads to see which work, and more importantly, why they work.
Using MagicBrief, you can quickly save ads from Facebook, TikTok and Instagram and store them into your personal ad library. You can then collect data, view ads details and create ads that far supersede your competition!
Register today with MagicBrief and start saving ads using our Chrome extension. You won't be disappointed with the results!
.webp)